Indigenous Microorganisms (IMO)
Turning plain rice into IMO is the most "mystical" part of KNF, but it's actually just high-level microbiology — the process of taking local, wild fungi and bacteria and "domesticating" them so they can thrive in your grow tent.
3–5 days
Store 1yr+
5–7 days
5–7 days
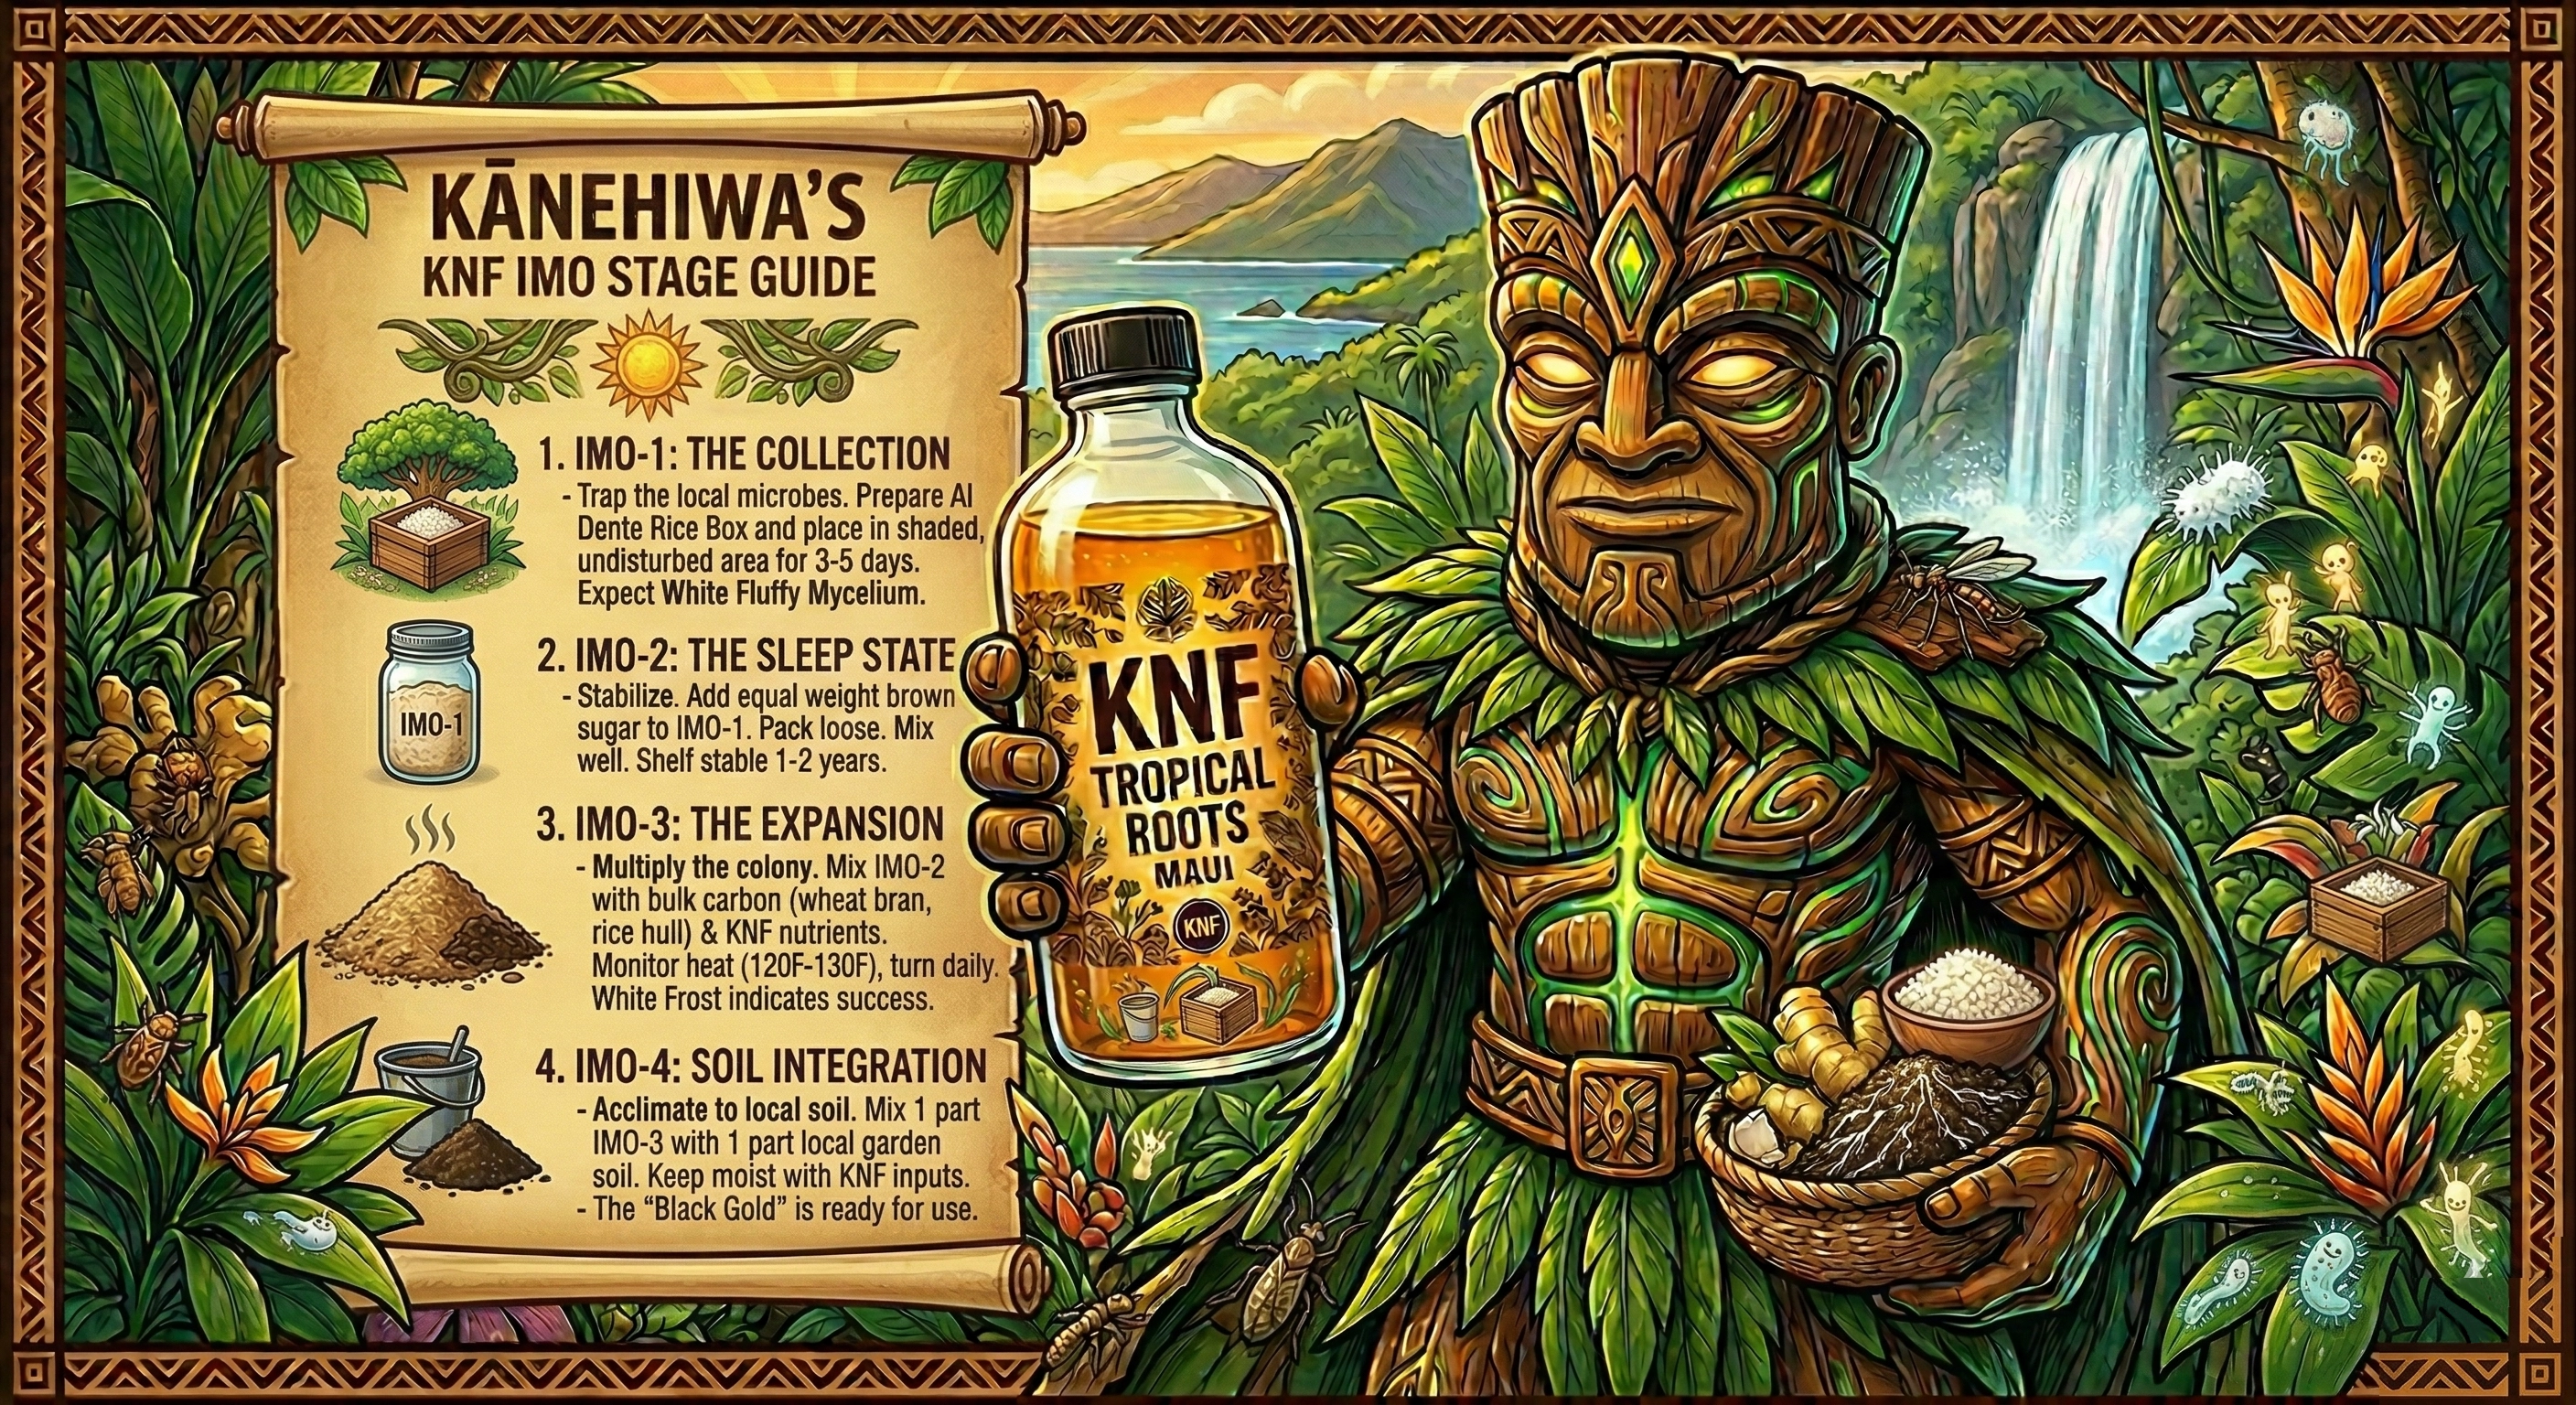
IMO-1: The Collection
Trap the local microbes — the indigenous fungi and bacteria that are already adapted to your specific climate, soil, and UV levels.
To get a successful IMO-1 collection, the texture of the rice is everything. If it's too mushy, it will rot; if it's too hard, the microbes can't "eat" it. You want it al dente — firm in the middle but cooked on the outside.
🍚 The "Al Dente" Rice RecipeThe Ratio: Use 1 part white rice to 1.5 parts water. (Example: 2 cups rice to 3 cups water.)
The Steam: Cook it in a standard rice cooker, but pull it out about 5 minutes early — just as the water has been fully absorbed but the rice still has a "bite" to it. If you press a grain between your fingers, the outside should be soft but you should feel a firm core.
The Cool Down: Spread the rice out on a clean tray to let the steam escape. You want it at room temperature before putting it in your wooden collection box. Hot rice will kill the very microbes you're trying to attract.
📦 Setting Up Your Collection BoxFill: Fill your wooden box about 1/3 to 1/2 full. Don't pack it down — keep it loose so oxygen can reach the bottom. The gaps between the grains allow airflow, which is essential for microbial colonization.
Cover: Secure a paper towel or coffee filter over the top with a rubber band. This keeps out bugs but lets the "breath" of the forest in.
The Guard: Place a heavy wire mesh screen or a milk crate over the box once you set it out. This is your wildlife barrier — critical for preventing contamination or total loss of your collection.
Place the box in a shaded, undisturbed area under a healthy tree — banyan and mango work great. Tuck it into the leaf litter at the base of the tree where the forest floor ecosystem is most active. Elevate it slightly off the ground on a rock or small platform.
✅ The ResultAfter 3–5 days, the rice should be covered in a white, fluffy mold (mycelium). It should smell sweet and earthy, like a fresh forest floor after rain.
The IMO-1 Color Guide
Here is your quick-reference guide to knowing if you've captured the "Good Guys" or the "Bad Guys."
| Color | Status | What It Is / What to Do |
|---|---|---|
| ⬜ Pure White | Golden | Beneficial mycelium (fungi). Should look like fluffy cotton or white spiderwebs. This is exactly what you want. |
| 🟡 Yellow / Gold | Great | Often indicates beneficial yeast or specific local bacteria. Keep it! |
| 🟠 Pink / Soft Orange | Okay | Usually harmless local microbes. If it's just a small patch, it's fine to include. |
| 🔴 Deep Red / Purple | Danger | Often indicates Fusarium or other pathogens. If it's more than a tiny speck, discard the box. |
| 🟢 Green / Blue-Green | Caution | Usually Trichoderma (like bread mold). While generally good for soil, too much in IMO-1 means your rice was too wet. |
| ⚫ Black / Slimy Grey | Abort | Rot (putrefaction). Usually smells like a swamp or gym socks. Toss it out — do not bring this into your grow room. |
Your nose is your best lab equipment.
Sweet fermented rice, alcohol, fresh rain, or a clean forest floor.
Vinegar (too acidic), sour milk, or something dead. Discard immediately.
Don't touch it: Try not to touch the mold with your bare hands — use a clean wooden spoon if you need to move it. Your skin oils and bacteria can contaminate the culture.
The Sugar Lock: Have your brown sugar and a scale ready before you check the box. As soon as you confirm the white fuzz is there, you need to weigh it and mix it with sugar immediately to "lock in" the freshness — this becomes IMO-2.
Location Matters: If your box comes back empty or dry, the spot was too dry. If it's a colorful mess, the spot was too wet or near a trash can / rotting fruit. Adjust your site and try again.
IMO-2: The Sleep State
Stabilize the microbes so they don't die or rot — preserving them in a dormant state until you're ready to expand them. Here is exactly how to move from the forest floor to your storage shelf.
📦 Step 1: The HarvestRemove the Box: Bring your IMO-1 box inside to a clean workspace.
Inspect: Confirm you have that beautiful white mycelium. If there are small spots of black or bright red, use a clean spoon to scoop them out and discard them before proceeding. Refer to the Color Guide above — only white, yellow, and small pink patches should make it into the bowl.
Weigh the Rice: Empty the contents of the box into a clean mixing bowl. Weigh the rice (including the mold). Let's say it weighs 500g.
🤎 Step 2: The 1:1 Sugar LockMeasure Sugar: You need an equal weight of brown sugar. If you have 500g of rice, you need 500g of brown sugar.
The Mix: Pour the sugar over the rice. Use your hands (clean and dry!) to knead the sugar into the rice.
The Goal: You want to break up the clumps of rice until every grain is coated in sugar. It should eventually look like a dark, sticky, fermented "dough" or a thick jam.
Why this works: The sugar draws the moisture out of the fungal cells through osmosis, putting them into a dormant "suspended animation." They aren't dead — they're just sleeping.
🫙 Step 3: Jarring & StoragePack the Jar: Place the mixture into a clean glass jar (Mason jars are perfect).
Leave Headroom: Only fill the jar about 2/3 full. The microbes may still "burp" a little gas as they settle into their sugar bath.
The Breathable Lid: Cover the top with a paper towel or coffee filter and a rubber band for the first 2–3 days.
Seal It Up: Once the mixture has settled and stopped expanding, you can put a solid lid on it.
Store: Keep it in a cool, dark place — not the fridge. Room temperature is ideal.
✅ Step 4: How to Know You SucceededVisual: After a few days, the mixture may liquefy slightly into a thick syrup.
Smell: It should smell like boozy molasses or sweet fermented fruit.
Shelf Life: This IMO-2 is now a "mother culture." It will stay viable for 1 to 2 years on your shelf.
IMO-3: The Expansion
Wake the microbes up and multiply them into a massive colony — going from a jar of dormant culture to a pile of living, breathing biology.
🔬 The ProcessMix your IMO-2 with a bulk carbon source — wheat bran, rice hull, or even shredded cardboard all work. Add a diluted KNF nutrient solution (FPJ, OHN, BRV) to give the waking microbes food and moisture.
🔥 The FermentationPile this mixture up and cover it. Over 5–7 days, the microbes will begin to devour the bran. The pile will get hot — up to 120°F–130°F. You must turn the pile daily to keep it from overheating. Temperatures above 140°F will start killing the very microbes you're trying to cultivate.
✅ The ResultWhen the heat drops and the whole pile is covered in white "frost" (mycelium), you have IMO-3. It should smell like rich forest soil — earthy, sweet, and alive.
IMO-4: The Soil Integration
Acclimate the microbes to your specific garden soil — the final step that makes your IMO truly indigenous to your grow site.
🌍 The ProcessMix 1 part IMO-3 with 1 part of your local garden soil. If you're growing in pots, use the same base soil you plan to grow in.
⏳ The FermentationLet this sit in a pile for another 5–7 days, keeping it moist with diluted KNF liquid inputs (LabS, FPJ, OHN). The microbes will colonize the soil particles and integrate with whatever biology already exists in your garden soil.
✅ The ResultThis is the "Black Gold." You now have a hyper-local, super-charged soil amendment that is perfectly adapted to the Maui environment. It smells like the richest forest floor you've ever encountered.
How to Use IMO-4
Sprinkle a handful on top of your pots and cover with mulch. The microbes will work their way down into the root zone.
Mix into your potting soil before planting at a ratio of about 10% by volume.
White mycelium mats (fuzzy webs) growing on your soil surface — the microbes are actively feeding your plants.
Liquid IMO (LIMO) — The Fast Track
LIMO is the perfect "fast-track" for indoor growers or anyone in a small space. While traditional IMO-3 and IMO-4 take weeks of turning piles of soil, LIMO allows you to deliver those indigenous microbes to your plants in a single afternoon. Think of it as a "Microbial Tea" brewed from your shelf-stable IMO-2.
🧪 Materials Needed5 gallons of dechlorinated water — see the Water Science guide (bubble it first!).
2 tablespoons of IMO-2 — your "mother culture" from Stage 2.
2 tablespoons of FPJ — the "food" to wake the microbes up.
1 tablespoon of OHN — keeps the brew clean and pathogen-free.
A mesh bag or paint strainer bag — to hold the IMO-2.
An air stone / bubbler — crucial for keeping the microbes alive and multiplying.
🔬 The Brew Process1. The "Teabag": Place your 2 tablespoons of sticky IMO-2 into the mesh bag. Tie it off.
2. The Wake-Up Call: Add your FPJ and OHN directly into the 5-gallon bucket of dechlorinated water. Stir it well.
3. The Massage: Submerge the IMO-2 bag in the water and massage it with your hands for about 5 minutes. You want to wash the sugar and the microbes out of the rice and into the water. The water will turn a murky brown.
4. The Bubble: Drop in your air stone and let it bubble for 6–12 hours. The oxygen and the sugars from the FPJ will cause the microbes to "wake up" and multiply rapidly.
5. The Finish: You'll know it's ready when a light, white foam (like sea foam) starts to form on the surface. This is microbial activity — your brew is alive.
💧 How to Apply LIMONo Dilution Needed: Use the LIMO brew at full strength as a soil drench.
The Timing: Apply it immediately once the brew is finished. Microbes are living things — if you let the bucket sit without air for too long, they will suffocate and die.
Best Time to Apply: Early morning or late evening, just before or after you water with your regular nutrients.
⚡ Why LIMO is a Game ChangerImmediate Results: You'll often see a "fuzzy" white layer of mycelium on your soil surface within 48 hours of drenching.
Compatibility: It works perfectly with AutoPot systems or standard fabric pots. Just make sure to run clean water through your lines afterward so the microbes don't clog your valves with their growth.
I. The Foundational Biology
🍄 IMO (Indigenous Microorganisms) — From Rice Box to Black Gold
🧫 LabS (Lactic Acid Bacteria) — The Clean-Up Crew
II. The Primary Growth Engines
🐟 FAA (Fish Amino Acids) — The Nitrogen Engine
🌱 FPJ (Fermented Plant Juice) — The Growth Hormone
III. Specialized & Bloom Nutrition
🦴 WCA (Calcium) — The Cell Wall Builder
🔥 WCA-P (Calcium Phosphate) — The Bloom Fuel
🛡️ OHN (Oriental Herbal Nutrient) — The Immune Booster
IV. Application & Strategy
📋 KNF Feeding Schedule — Seed to Harvest Program
📊 KNF Feeding Chart — Printable Quick Reference
🐛 Pest & Disease Troubleshooting — Maui Edition
Plants vs. Fungi — The Biological War & Peace
While both plants and fungi were once classified together in the botanical world, they are as different from each other as a sunflower is from a seagull. In the Tropical Roots Maui ecosystem, understanding this distinction is the key to mastering the "microbial fortress."
⚔️ The Core Biological Differences| Feature | Plants (Plantae) | Fungi (Fungi) |
|---|---|---|
| Energy Source | Autotrophs: Create their own food via photosynthesis. | Heterotrophs: Must consume organic matter (decomposers). |
| Cell Wall | Made of Cellulose. | Made of Chitin (same as shrimp shells). |
| Storage | Store energy as Starch. | Store energy as Glycogen (like humans). |
| Movement | Rooted, but grow toward light (Phototropism). | Grow toward food sources (Chemotropism). |
Plants are producers. They use chlorophyll to capture sunlight, CO₂, and water to create glucose. They are the foundation of the food chain, turning light into physical matter.
🍄 Fungi: The External StomachsFungi do not "eat" in the traditional sense. They secrete powerful enzymes into their environment to break down complex molecules (like fallen logs or dead insects) and then absorb the dissolved nutrients through their Hyphae.
Despite their differences, the most successful gardens rely on a "handshake" between the two. In a healthy living soil, Mycorrhizal fungi attach themselves to plant roots.
1. The Deal: The plant gives the fungi excess sugar (carbon) produced via photosynthesis.
2. The Payback: The fungi act as an extended root system, reaching deep into the soil to grab phosphorus and water that the plant roots can't reach on their own.
⚠️ The Battle: Pathogenic FungiNot all fungi are friends. In the humid Maui air, certain fungi like Powdery Mildew or Botrytis (Bud Rot) act as parasites, stealing energy from the plant without giving anything back, eventually killing the host.
The Defense: This is why we use LabS (Lactic Acid Bacteria) and OHN. By saturating the plant's surface with "good" microbes, we leave no room for the pathogenic "bad" fungi to land and take hold.
This guide is provided for educational purposes only. Always research local laws and regulations before cultivating. Tropical Roots Maui assumes no responsibility for actions taken based on this information.