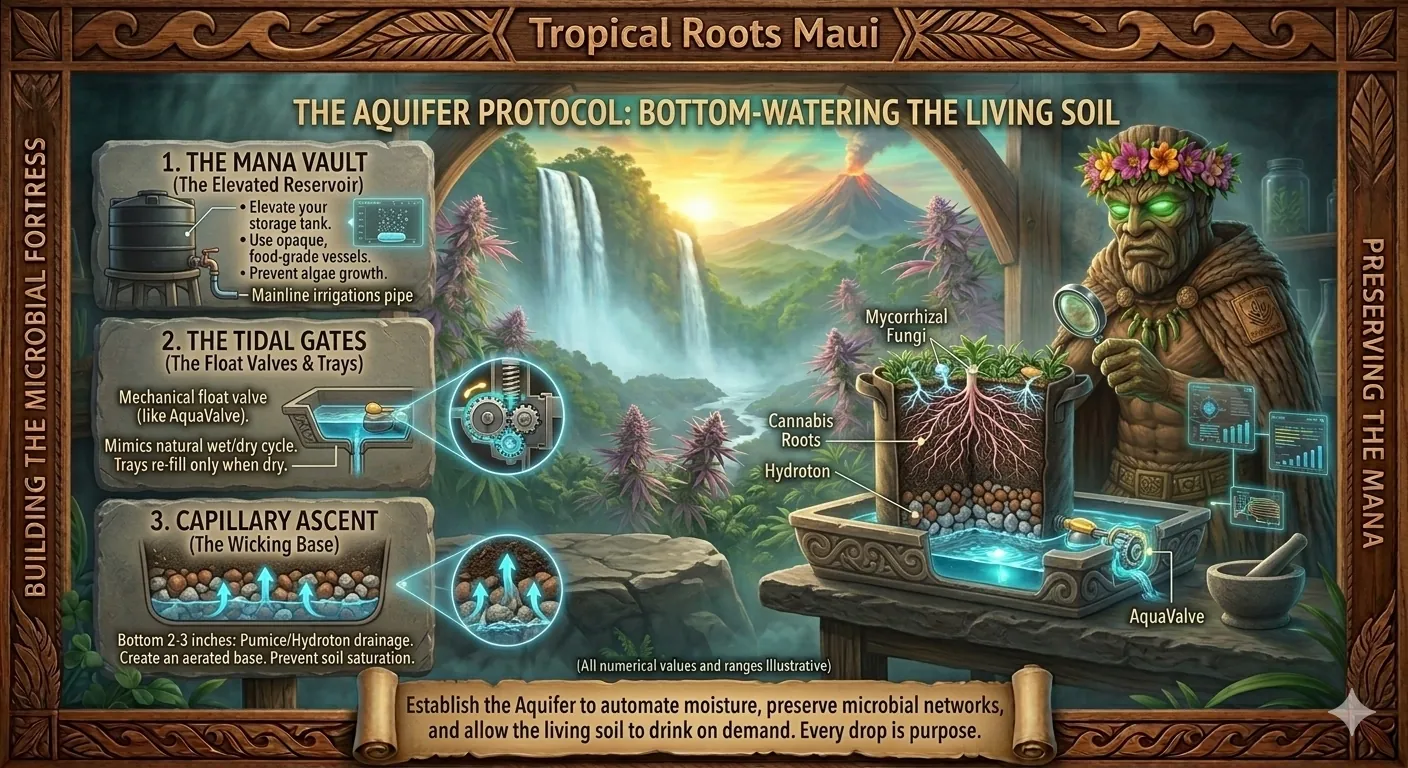
The Aquifer Protocol
Automating the Living Soil Oasis · Gravity-Fed Bottom Watering
"Feed from the top, drink from the bottom. Let gravity deliver the water and the microbes deliver the nutrients."
Traditional top-watering compacts the soil, disrupts the microbial top-layer, and creates a cycle of drowning and drought. By utilizing gravity-fed bottom watering, we mimic a natural underground water table: allowing the plant to drink exactly what it needs via capillary action, keeping the Microbial Fortress perfectly humid and undisturbed.
Gravity is the most reliable pump in the sanctuary. By elevating your storage tank above your canopy floor, you create natural, consistent pressure that requires no electricity and never fails.
Use a dark, opaque, food-grade tank (15–50 gallons depending on plant count) to prevent light penetration and algae growth. Black HDPE tanks or covered IBC totes work well. Raise the tank at least 2–3 feet above the tray level on a sturdy shelf or stand for adequate gravity pressure.
Even pure rainwater needs movement. Place a small circulation pump or air stone inside to keep the water dynamic and oxygenated. Stagnant water breeds anaerobic bacteria and biofilm: both enemies of clean float valves. A simple aquarium air pump running 24/7 is sufficient.
The Golden Rule: Keep the reservoir strictly for pure, dechlorinated water only. Never put thick organic nutrients, compost teas, or Humic Acid in the reservoir: biofilms will quickly clog your lines and valves. All nutrition goes through the top of the pot, never through the plumbing.
The plumbing must be pristine to deliver the mana to the roots. Clean lines mean consistent flow; clogged lines mean dead plants.
Run a ½-inch irrigation mainline from the reservoir spigot to your grow area. Use food-grade black poly tubing: black prevents algae growth inside the line. Keep runs as short and straight as possible to maintain consistent pressure across all trays.
Install an inline screen filter (150–200 mesh) immediately after the reservoir spigot. Even purified rainwater accumulates microscopic organic matter over time. This filter is your primary defense against clogged float valves: the single most common failure point in SIP systems. Clean it monthly.
Use ¼-inch tubing to branch off the mainline into individual plant trays. Use barbed tee fittings at each junction. Keep micro-line runs under 6 feet to prevent pressure drops. Each line terminates at the float valve inlet on its respective tray.
This is where the automation happens. Each fabric pot sits inside a specialized tray equipped with a mechanical float valve: the heart of the system.
When the tray is dry, the float valve opens, allowing gravity to push approximately one inch of water into the tray. Once the water hits a specific height, the float shuts off mechanically: no electronics, no timers, no batteries. Pure mechanical reliability.
The valve will not open again until the plant has entirely consumed the water in the tray. This mimics a perfect, natural wet/dry cycle without human intervention: the plant drinks at its own pace, and the soil never stays saturated long enough to become anaerobic.
Water flows upward into the living soil through the magic of capillary action: the same force that pulls water up through a tree trunk. The pot structure must be designed to facilitate this.
The bottom 2–3 inches of your fabric pot should be filled with large chunks of pumice, hydroton (clay pebbles), or perlite. This creates an aerated base that sits in the water tray, preventing the dense living soil from becoming waterlogged. The air gaps between the chunks are critical: they allow oxygen to reach the root zone even when water is present.
The living soil rests directly on top of this drainage layer. Like a sponge, the soil naturally pulls moisture upward through the pumice, hydrating the roots evenly at a perfect 50–70% field capacity. The moisture gradient creates an ideal environment: wetter at the bottom where the roots drink, drier at the surface where the microbial fortress thrives.
Maui's abundant rainfall makes catchment water the ideal SIP source: it's naturally soft, mineral-free, and pH-neutral. Filter through a basic sediment + carbon setup before the reservoir. During dry Kona wind seasons (Oct–Feb on the leeward side), having a 100+ gallon reserve tank ensures you never run dry.
Open water trays in Hawaiʻi's tropical climate are mosquito breeding grounds. The dryback cycle helps: trays should empty every 24–48 hours. For the reservoir, ensure it's fully sealed with screened vents. Adding a few drops of BT (Bacillus thuringiensis) to the reservoir monthly kills mosquito larvae without harming plants.
Maui reservoir water can exceed 80°F in summer sun, stressing roots and reducing dissolved oxygen. Keep your tank in shade or wrap it in reflective insulation. Ideal root-zone water temperature is 65–72°F. A frozen gallon jug dropped into the reservoir on hot days can bring temps down quickly.
Tropical warmth and humidity accelerate algae growth in lines and trays. Flush your entire system with a mild hydrogen peroxide solution (3%, 1 cup per gallon) between grows. Keep trays clean: a quick wipe during dryback prevents green buildup on tray surfaces.
For educational purposes only. This guide covers gravity-fed irrigation techniques for legal cannabis cultivation. Always follow local agricultural and water-use regulations. Results vary by climate, soil composition, and system setup. The information provided is not a substitute for professional consultation.